I have been flat ironing my hair on and off for about two years and now and I feel like every time I do it, my hair comes out different. I never get the same feel of my hair twice. I always wondered if it's the products I'm using, the iron or technique.
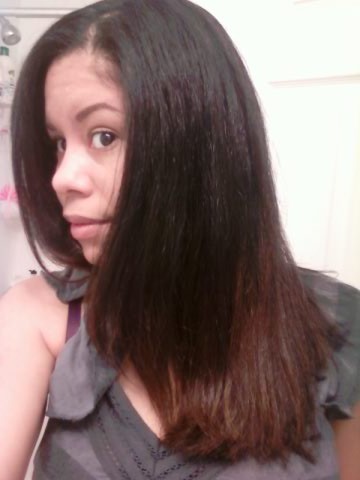
This time I diluted some of my Giovanni 50/50 shampoo with water ( 1 part poo and 2 parts water). I then deep conditioned with silicon mix for about 20 minutes under the dryer. My hair was so soft, but of course, it was filled with cones. After rinsing I used some Skala cerimide leave-in, combed out my hair and let it airdry. I then flat ironed in sections spraying some silk elements heat protectant. The flat iron I'm currently using is Leornardo ceramic 1" (I got this from ebay for 30.00). It works really good. I have also tried the solia 1 1/2" and GVP from sally's. So far I like leonardo the best. My hair came out excellent. I loved the way my hair felt. Usually when I flat iron my hair, it is dry or not straight enough or too poofy. This time my hair was soft and shiny root to tip. This may also be because every part of my hair except for the last 2" is virgin hair.
Since I've been flat ironing my hair, I learned some lessons that can maybe help someone who is still trying to master flat ironing. One thing that help me is to remind myself that hair is just like fabric. When we iron our clothes, we are gentle with it and we go through each section of the clothes making sure that each wrinkle is smoothed out. If we rush through ironing clothes, you still see some wrinkles and the results are not as good. Patience is definitely the most important thing to getting good results.
I've decided to list some do's and don'ts when flat ironing your hair:
1. Do not flat iron wet or damp hair. I know that there are irons that say you can, but don't. That will damage your hair. Make sure it is completely dry. I prefer to air dry rather then use a blow drier. You can blow dry on low heat, but for some reason it seems to suck out the moisture more from my hair. If you know you won't have time to air-dry, wash the day before, section out your hair and let it air dry over night. You can then flat iron the next day. I also add some type of creamy leave-in like, Skala cerimide leave-in or lacio lacio to seal some moisture. This is the only other product, besides the heat protectant spray, I use.
2. Do not use only natural oils to flat iron. I know some people do this to avoid chemicals and build up however, the process of flat ironing is very rough on the hair and you will need to protect it with strong silicones. You can add dab a tiny bit of oil at the end. I sometimes use a little coconut oil after my hair is flat ironed. The purpose of silicones is to add a layer to your hair sealing the hair and protect it from outside damage. The high heat from flat ironing will quickly eat up those oils and leave your hair vulnerable to damage. You can also use a gentle sulfate when it comes time to washing you hair again. I usually shampoo my hair with a gentle sulfate when I'm switching back to curly hair. Products with mineral oil and no silicone may also work, but again, the stronger the silicone, the more protection. Mineral oil is not strong enough and will offer only a little protection. The strongest silicone I believe is cyclomethicone. You want your heat protector to have this ingredient at the top of the list. Now if you are doing wash and go's, I do not recommend using products with silicones since you will have to use a sulfate shampoo to get rid of it.
3. Pre-poo. I know most people just go straight into washing their hair, but I would suggest adding an oil or some type of treatment before shampooing. I usually pre-poo with coconut oil or olive oil. I just drench my hair with oil and let it sit on my hair for at least an hour massaging my scalp. When I first enter the shower, I let the warm water through my hair for a few minutes before I shampoo. Since water alone does not remove the oils, the warm water allows for the oils to penetrate into the hair better. I then proceed to shampooing my hair. I also add eggs to my pre-poo if my hair needs protein. Pre-pooing protects you hair from drying out when you shampoo and will affect the results of your hair during flat ironing.
4. Do deep condition under a dryer. I think this is the most effective way to do it. I have tried leaving my conditioner under a plastic bag with no heat and the results are not the same. Body heat is not as warm as a hair dryer. Heat opens the cuticles of you hair and allows the deep conditioner to penetrate further. When I deep conditioned under a hair dyer this time around, my hair felt like butter.
5. section you hair as neatly as you can and avoid ironing too much hair in one section. The smaller the piece the straighter and neater your hair will be. You also won't have to go over it again and again. I also use a comb or brush right underneath the flat iron so it keeps all the hairs in place as the iron goes through it.
6. Remember that using too much or too little heat protectant can make all the difference. I use to think that the silk elements heat protectants spray was too greasy and heavy for my hair until I realized that I was using too much. I learned that three sprays per section from a distance is what my hair likes. I also don't combine any other heat spray or serum with it. I noticed this product works better alone. You may have to experiment with serums and sprays before you learn what your hair likes, but it does make a difference.
7. Take your time. I can't stress this enough. The more gentle you are and patience you have the better the results. Do not be tempted to snag on your hair, comb through knots carelessly and grab bigger sections to finish quicker. You will loose a whole lot of hair and you will not get all the sections evenly. You will then have to go back over it again and you will mix up and go over pieces that were already flat ironed, making your hair more prone to damage.
8. Do not automatically flat iron on the highest setting. Start at a lower temperature and work your way up slowly. For me the best temperature is around 385-390 degrees. Learn what's the lowest temperature your hair can work with.
9. If you find that your hair is not as straight as you like, especially the ends, instead of going over it continuously with the flat iron, add a dab of your creamy moisturizer or light oil and wrap your hair like you normally would. Put a saran wrap or scarf over your hair and sit under the dryer for a few minutes or over night. Usually the next day my hair is tamed and straight.
10. Most ladies know to keep a straight style, you must learn to wrap your hair. I do this for the first three nights. Since going natural my hair tends to get more greasy quickly.
Just for the fun I'm also adding this delicious recipe I made last night. I bought some organic apples and decided to try them baked for dessert with some vanilla ice cream. It was so good. I decided to take a picture and post it. This is the recipe I used from http://allrecipes.com:

- 4 tart green apples
- 1/2 cup brown sugar
- 4 tablespoons butter
- 2 teaspoons ground cinnamon
Directions
- Preheat oven to 350 degrees F (175 degrees C).
- Scoop out the core from top of the apple, leaving a well. Do not cut all the way through. Stuff each apple with 2 tablespoons brown sugar and 1 tablespoon butter. Place in a shallow baking dish and sprinkle with cinnamon.
- Bake in preheated oven for 15 minutes, until sugar begins to caramelize and apples are tender.
No comments:
Post a Comment